Interaction Testing with React and Storybook
In my last blogpost I shed some light on our pattern to isolate user interface development from the actual application framework to create an environment that really allows quick experimentation. Now it's time to bring in Storybook's latest and greatest feature: Interaction testing, which turns out to be a natural fit for our architecture.
LAST TIME ON …
"Take the Gatsby out of my Storybook" outlined our quest to free frontend developers from the shackles of application frameworks, databases and API endpoints. The abstraction we ended up with is built around the web's fundamental primitives: Links and Forms. Every user interaction that our frontend components implement ultimately comes down to either navigating to a new location or submitting data. Depending on the application framework or event feature of an application framework we use (Gatsby SSG, Gatsby SSR, Next.js, Remix …) these interactions might be handled very differently. Our frontend components should be compatible with all of them, so we need to draw our line there.
Instead of accepting the URL as a string and rendering an “” tag, that may or may not be compatible with the routing library that will be used, we accept a prepared React component that we trust to do the right thing. We only make sure it’s displayed correctly. Exactly the same approach can be applied to forms. We don’t care if the submission is handled via an actual POST request or serialized into an XHR call. The UI component should only be concerned with displaying the form and its elements and making sure the correct data is submitted. This approach has been manifested into the @amazeelabs/react-framework-bridge package, where you can read up on the details.
STORYBOOK INTERACTION TESTING
Among other things, the 6.4 release of Storybook brought one mind-blowing feature: Interaction testing. Along with a story, we can now define a “play” function that will execute when the story is loaded and allows us to do a lot of fancy things!
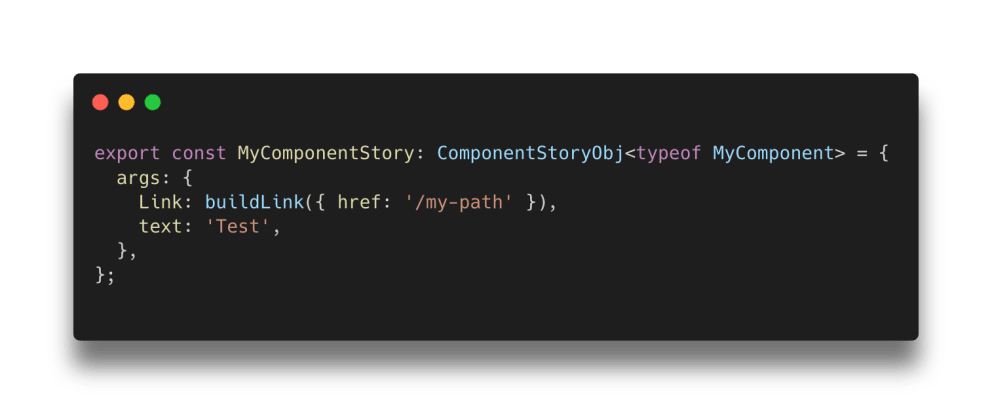
Let’s start with the simple example component we used last time:

We can now add a story using the new Component Story Format v3:
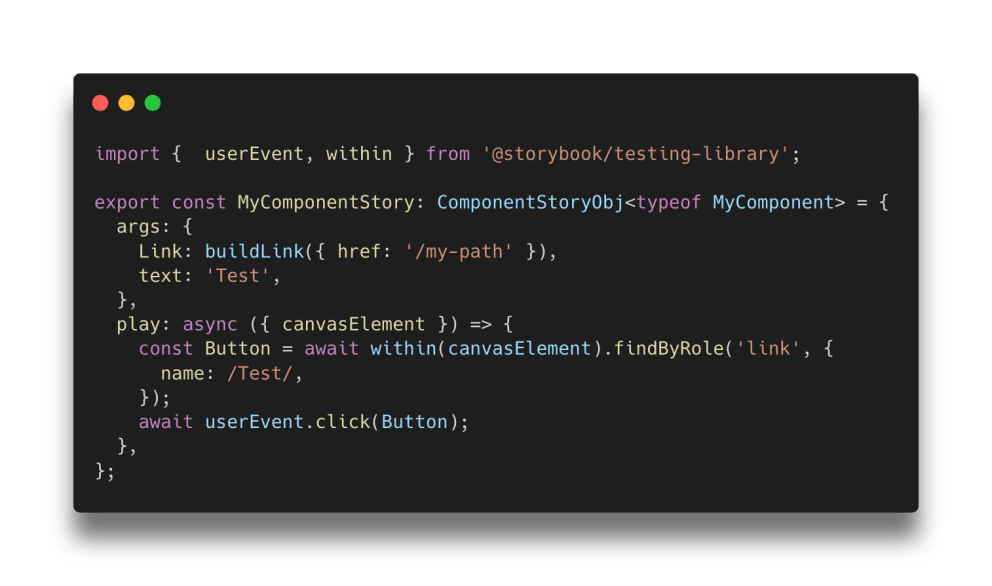
Make sure the @storybook/addon-interactions plugin is installed and activated in .storybook/main.js. Now we can add our first play function.
Storybook provides a special version of the testing-library package that we can use to target elements by their accessible properties within the canvasElement provided to the play function and even trigger user events.
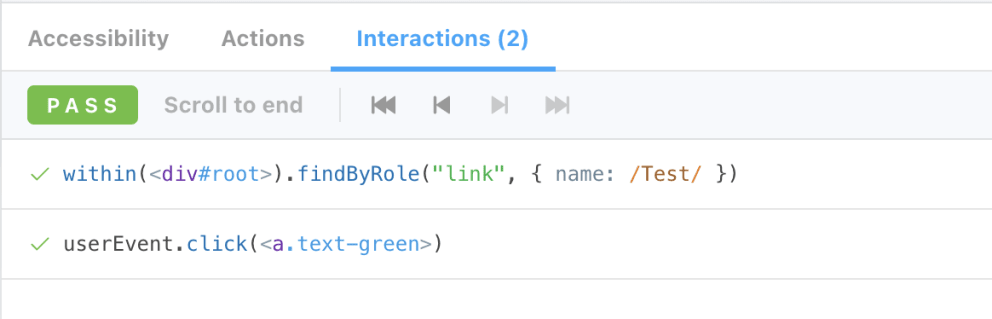
The interactions addon within the Storybook UI should show the successful test now. It would fail if our component would suddenly decide to render a button component instead of the link, or we forgot to render the actual text content.
Play functions allow us to change the internal state of our component without having to simulate it, but by triggering the actual user events that will also occur in production. Not only is it easier to write tests this way, it also brings the test environment much closer to reality. And the applications are endless. Unsurprisingly, this pairs perfectly with the Chromatic service, provided by the makers of Storybook, which will pick up play functions and allows you to run visual regression tests for the different states of the interface. But even if you don’t use it, you can benefit from play functions.
AUTOMATED TESTING
Right now the tests only run when we actually visit the Storybook page, but it would be better to have them executed automatically. To achieve that, we have to leave the clearly documented territory and delve a little deeper into the additional testing packages provided by Storybook.
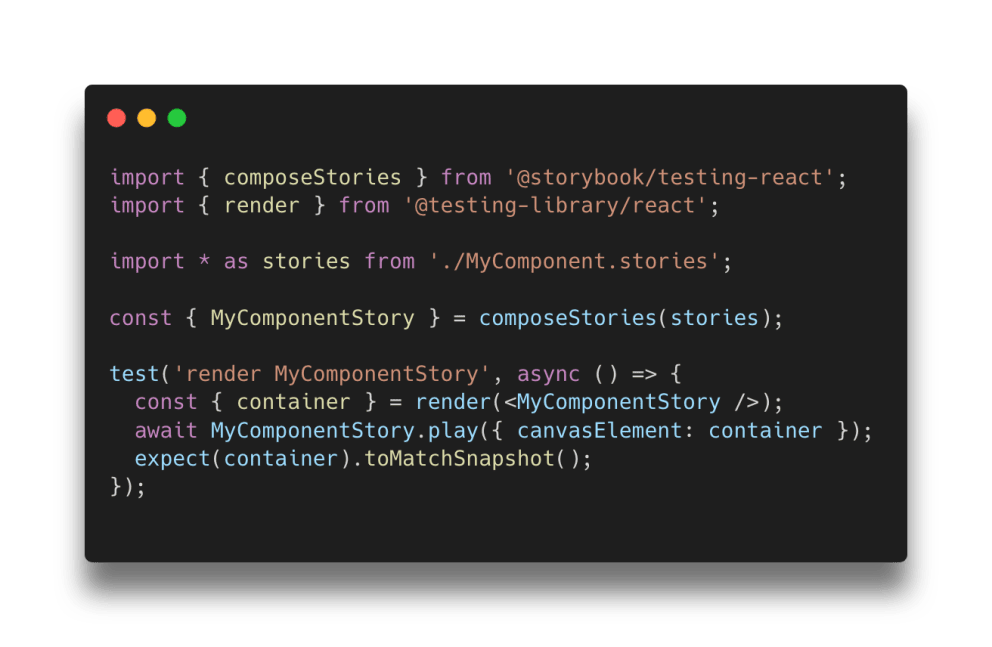
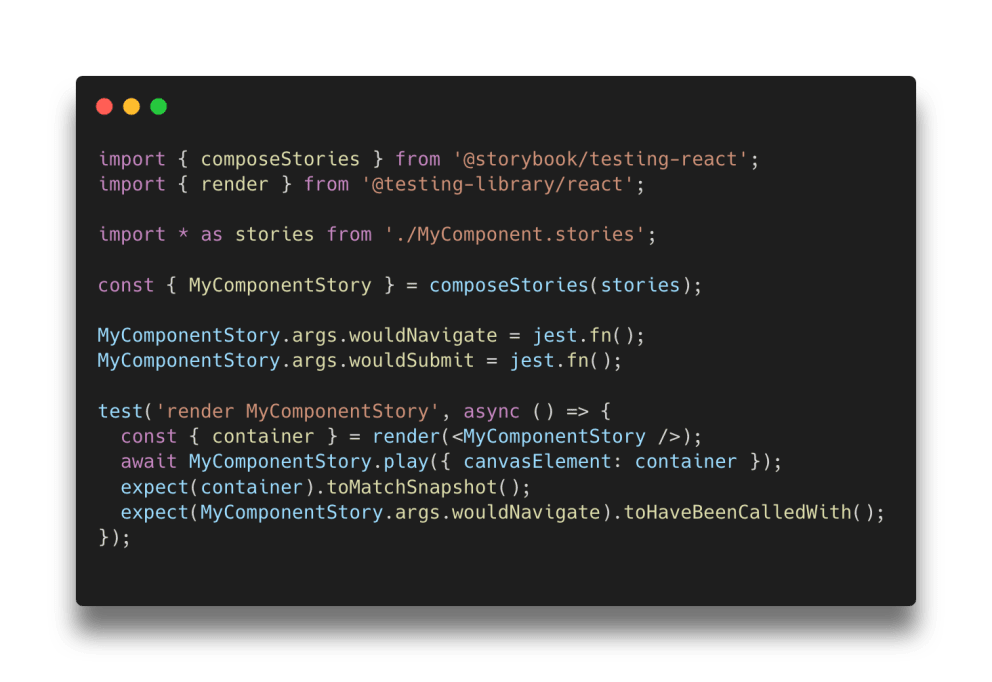
Interaction tests are already built on top of jest and @testing-library/react. This enables us to also render our stories within Jest and even execute the play functions along with any assertion they contain. First, we create a test file along with our component where we import our stories and use the helpers provided by @storybook/testing-react to prepare them for rendering in a test. Then a test function uses @testing-library/react‘s “render” function to render the story into a virtual DOM element which we eventually pass to the invocation of the story's “play” method. At this point, we have our DOM in the state “after” the interactions in the play method, and we could run additional assertions or use Jest’s snapshot feature.
To actually run this test, you will need a DOM-enabled Jest environment, which I will not cover here. There is enough information on how to set up Jest out there. The easiest option would be to simply configure jest to use jsdom. Technically it would also be possible to run Jest tests in other browser automation tools like Playwright.
ASSERTING CORRECT BEHAVIOR
At this point, we are confident that our component is displayed correctly and it does not break within itself, but we have no idea how it will interact with the rest of the application. That's where we circle back to the beginning of this blog post. The @amazeelabs/react-framework-bridge breaks down the user interactions to the fundamentals: navigating to another page or submitting values.
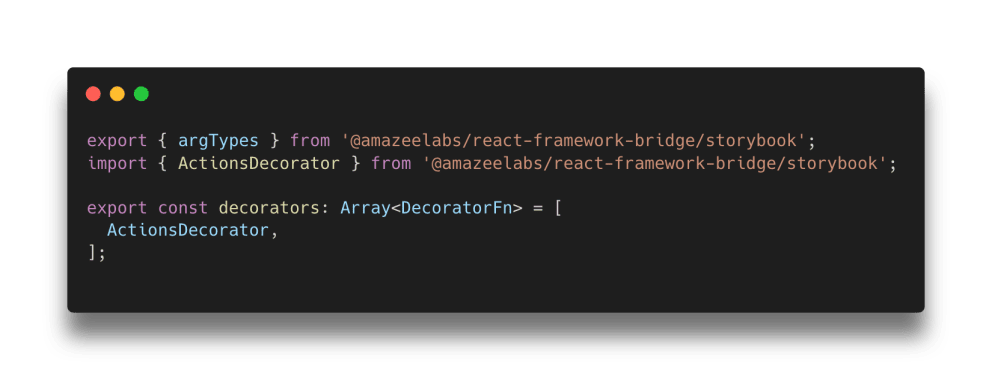
The @storybook/actions plugin is there to keep track of actions that leave the current component. In the default setup, it will pick up all story arguments that start with “on” (onClick, onSubmit …) and log them into the actions tool window.
The buildLink and buildForm functions in @amazeelabs/react-framework-bridge already integrate with that and will notify the actions plugin if a link within Storybook is clicked or a form would be submitted. It uses special “wouldNavigate” and “wouldSubmit” story arguments for that. These actions are already defined in the package, and we just have to re-export them from our project’s .storybook/preview.tsx file. That’s where we also apply the “ActionsDecorator” that is responsible for collecting all the events.
Now all interactions with links or forms, also the ones done by play functions, are logged as actions. Which is nice, but does not provide a lot of value on its own. But there is a rather well hidden integration between @storybook/addon-actions and @storybook/addon-interactions: every argument that would log an action is turned into a Jest mock function automatically. This means we can make our play function check if the component “would” have interacted with the outside correctly! In our example, we can add a check to our play function that verifies that clicking our component "would navigate" to the correct address.
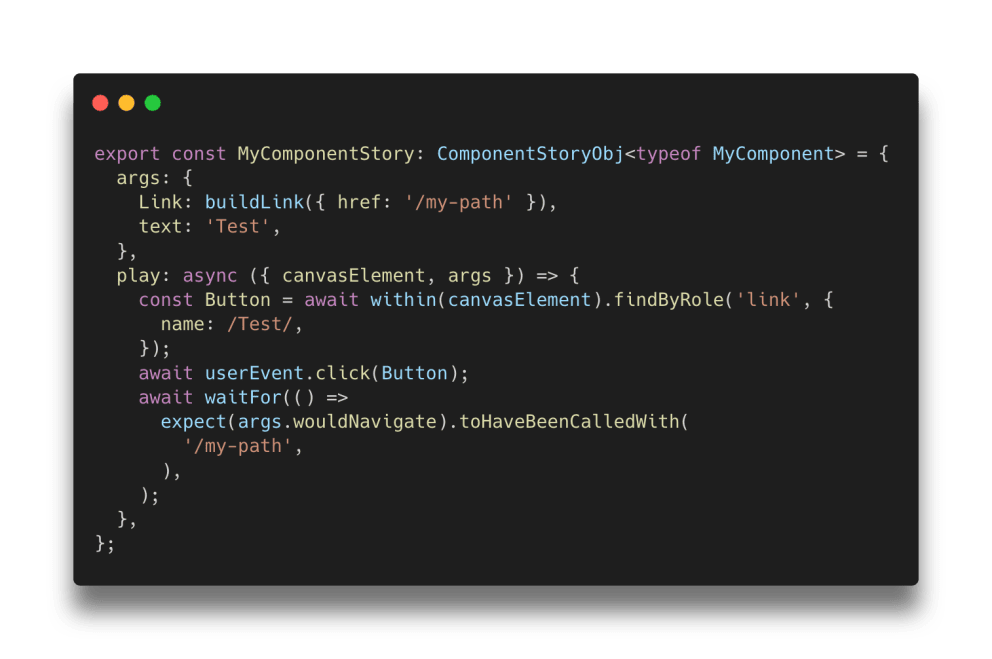
This should work in Storybook right away, but unfortunately, the automatic mapping of actions to Jest mocks is not integrated into @storybook/testing-react yet. To bypass this, we have to add the mocks in our test file, then everything should work as expected.
THAT'S A WRAP!
In the last blog post we learned how to separate our user interface components cleanly from the application logic, and in this one we could reap the benefits by using Storybook’s testing features to end-to-end test their correct display and integration. We are working to add more helpers to @amazeelabs/react-framework-bridge to achieve this even more easily, so stay tuned!